

Written in London by me
Back to the index
In the previous article, a bilingual Spark codebase was containerised and run locally as a multi-container Docker application. Such encapsulations of workloads are a prerequisite for using orchestrators like Kubernetes or Docker Swarm. This chapter takes the next step and explores the execution of containerised and orchestrated Spark applications. The basics of Kubernetes are covered below, two follow-up articles (here and here) show how apps can be launched against K8s backends that are local but fully featured.
Kubernetes Architecture Basics
Container orchestrators like Kubernetes help technologists with managing and maintaining their workloads, they automate various execution aspects like container rollout, networking, scaling, or failure handling. Kubernetes provides such functionality under a declarative philosophy – the user describes goals which the system then attempts to achieve and maintain. Most interactions with K8s involve resource descriptions, clients like the kubectl command-line interface, and API calls: Users typically express their intent as Kubernetes objects in YAML files or directly as command parameters, this information is parsed by clients and handed over to an API server in request bodies. Control loops then try to fulfil the intent by launching objects, scaling resources, etc.
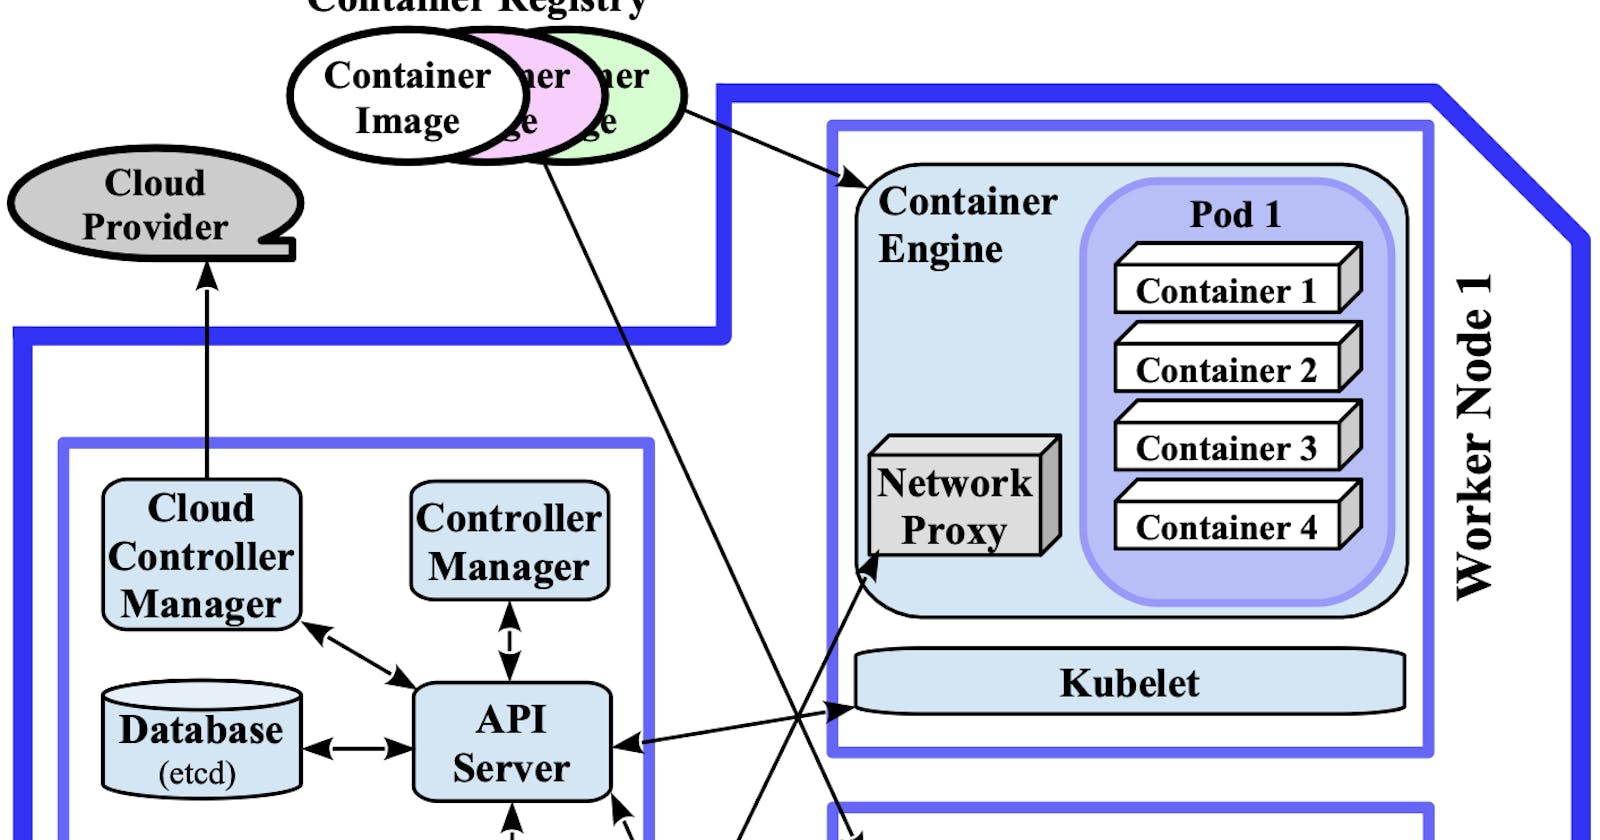
According to the official documentation, a K8s cluster consists of the control plane and at least one worker node which can be a physical or a virtual machine. The control plane (typically) runs on a master node and is comprised of several system components with different responsibilities, chief among them is the API server. As its name already suggests, the API server exposes a remote HTTP API and is the gatekeeper of and gateway to the cluster – it is crossed by most communication paths in the architecture diagram 2.1 below. A scheduler component assigns pods, the atomic unit of Kubernetes, to hosts. The master state and cluster configuration details are stored in etcd, a key-value database. The control loops that watch and modify the cluster state are referred to as controllers in Kubernetes lingo. Several core controllers run in the controller manager component of the control plane. If the K8s cluster is hosted on a cloud platform, additional centralised controllers of a dedicated cloud controller manager take care of cloud-specific aspects.
The orchestration layer described in the previous paragraph manages one or more worker nodes. On each worker node, several K8s system daemons run: The kubelet is responsible for creating pods/containers according to manifests and for setting up their storage resources, network connections, etc. The network proxy forwards requests originating from within or from the outside of the K8s cluster to pods. The container engine pulls images from a container registry and instantiates them when the kubelet launches pods. The most popular container runtime flavour on K8s is Docker.
One worker node can host one or more pods which are probably the most important Kubernetes abstraction: A pod is the smallest compute entity in the K8s object model that can be deployed. A single pod wraps one or more application containers which, due to the popularity of the Docker runtime, are often instances of a Docker image. As will be shown later, single-container pods (e.g., Pod 3 in the diagram below) have a special significance for Spark workloads.
The following diagram visualises the K8s constructs described above and their relationships in a small cluster that consists of one master and two worker nodes:
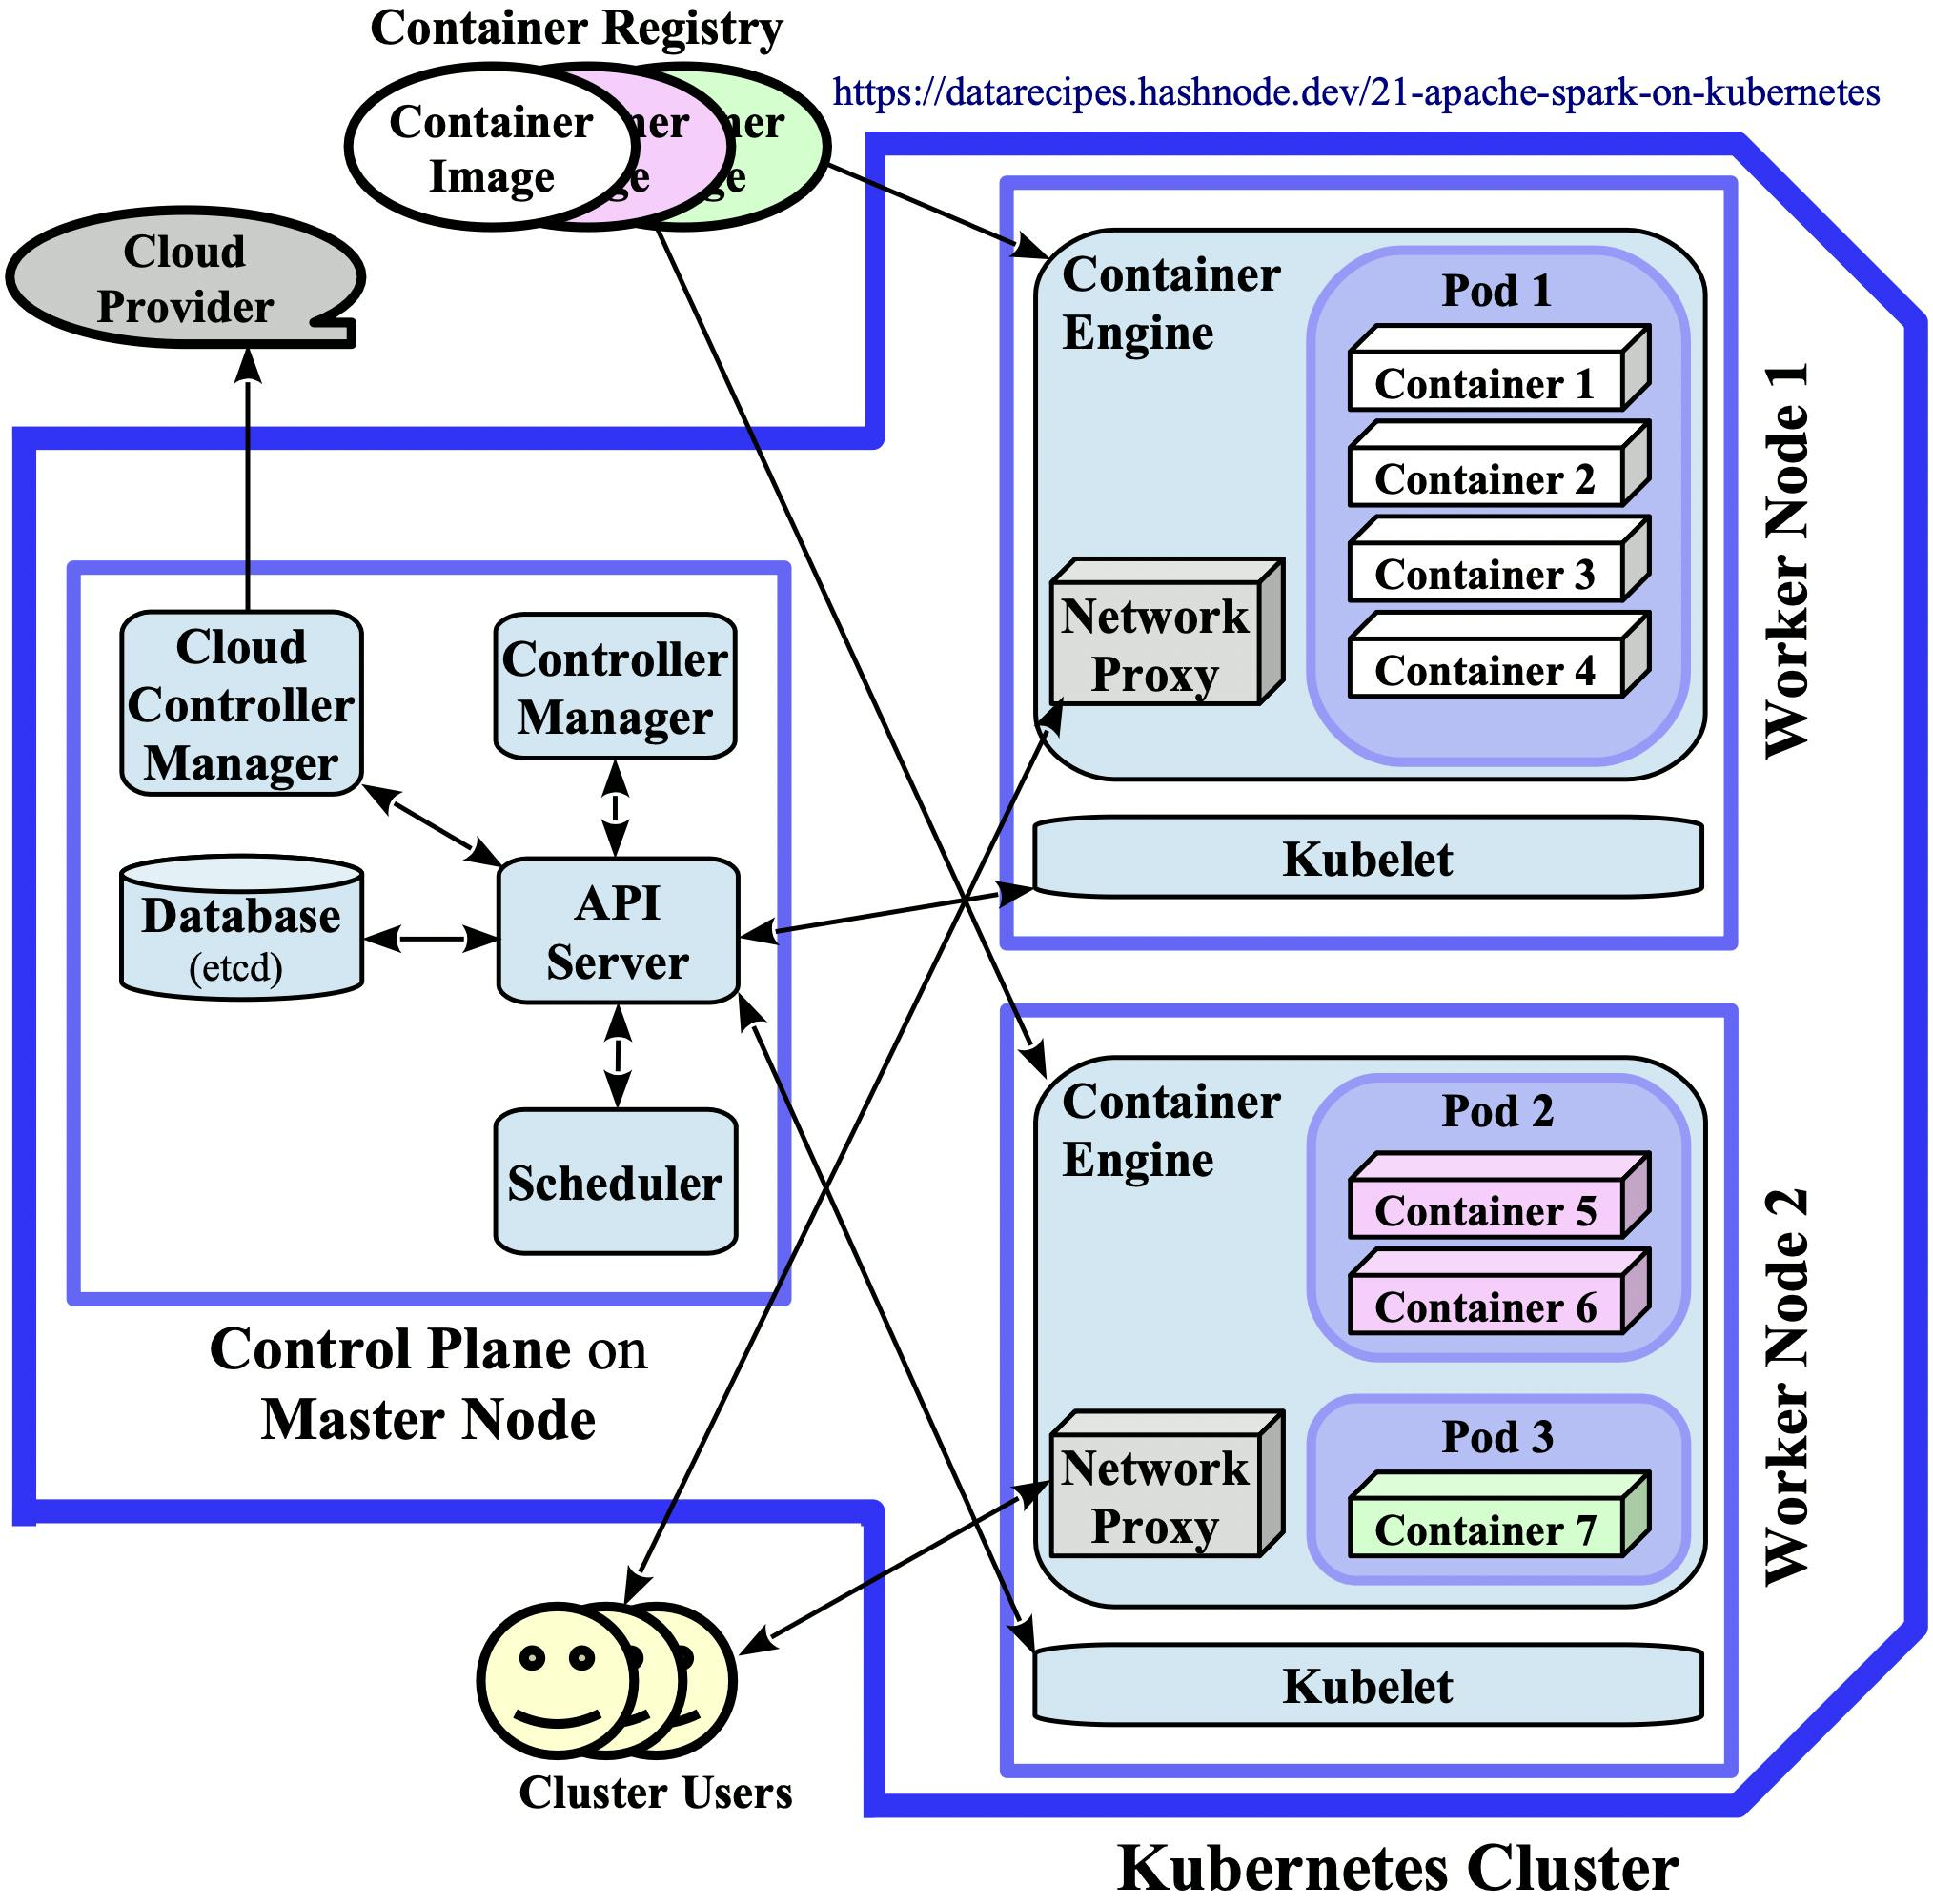 Diagram 2.1: Kubernetes Architecture
In the learning environments that are used in the practical articles §2.2 and §2.3, all K8s processes run in Docker containers on a single development machine. In such local contexts, the three rectangles that symbolise the Master and Worker Nodes coincide and correspond to the local machine. Nevertheless, the local deployments are "fully featured" and only the Cloud Controller Manager component is absent as it is not needed in a standalone context.
Local Kubernetes Environments
Docker Desktop and minikube are two popular tools for provisioning fully featured but local Kubernetes clusters. The system components of these clusters run as Docker containers on the developer machine. Minikube can also be deployed as a VM or on bare-metal. Both tools are available on macOS and Windows, Linux is only supported by minikube. The activation/installation steps for the two environments are described below, a dedicated follow-up article is available for each one here (minikube version) and here (Docker Desktop edition).
Docker Desktop
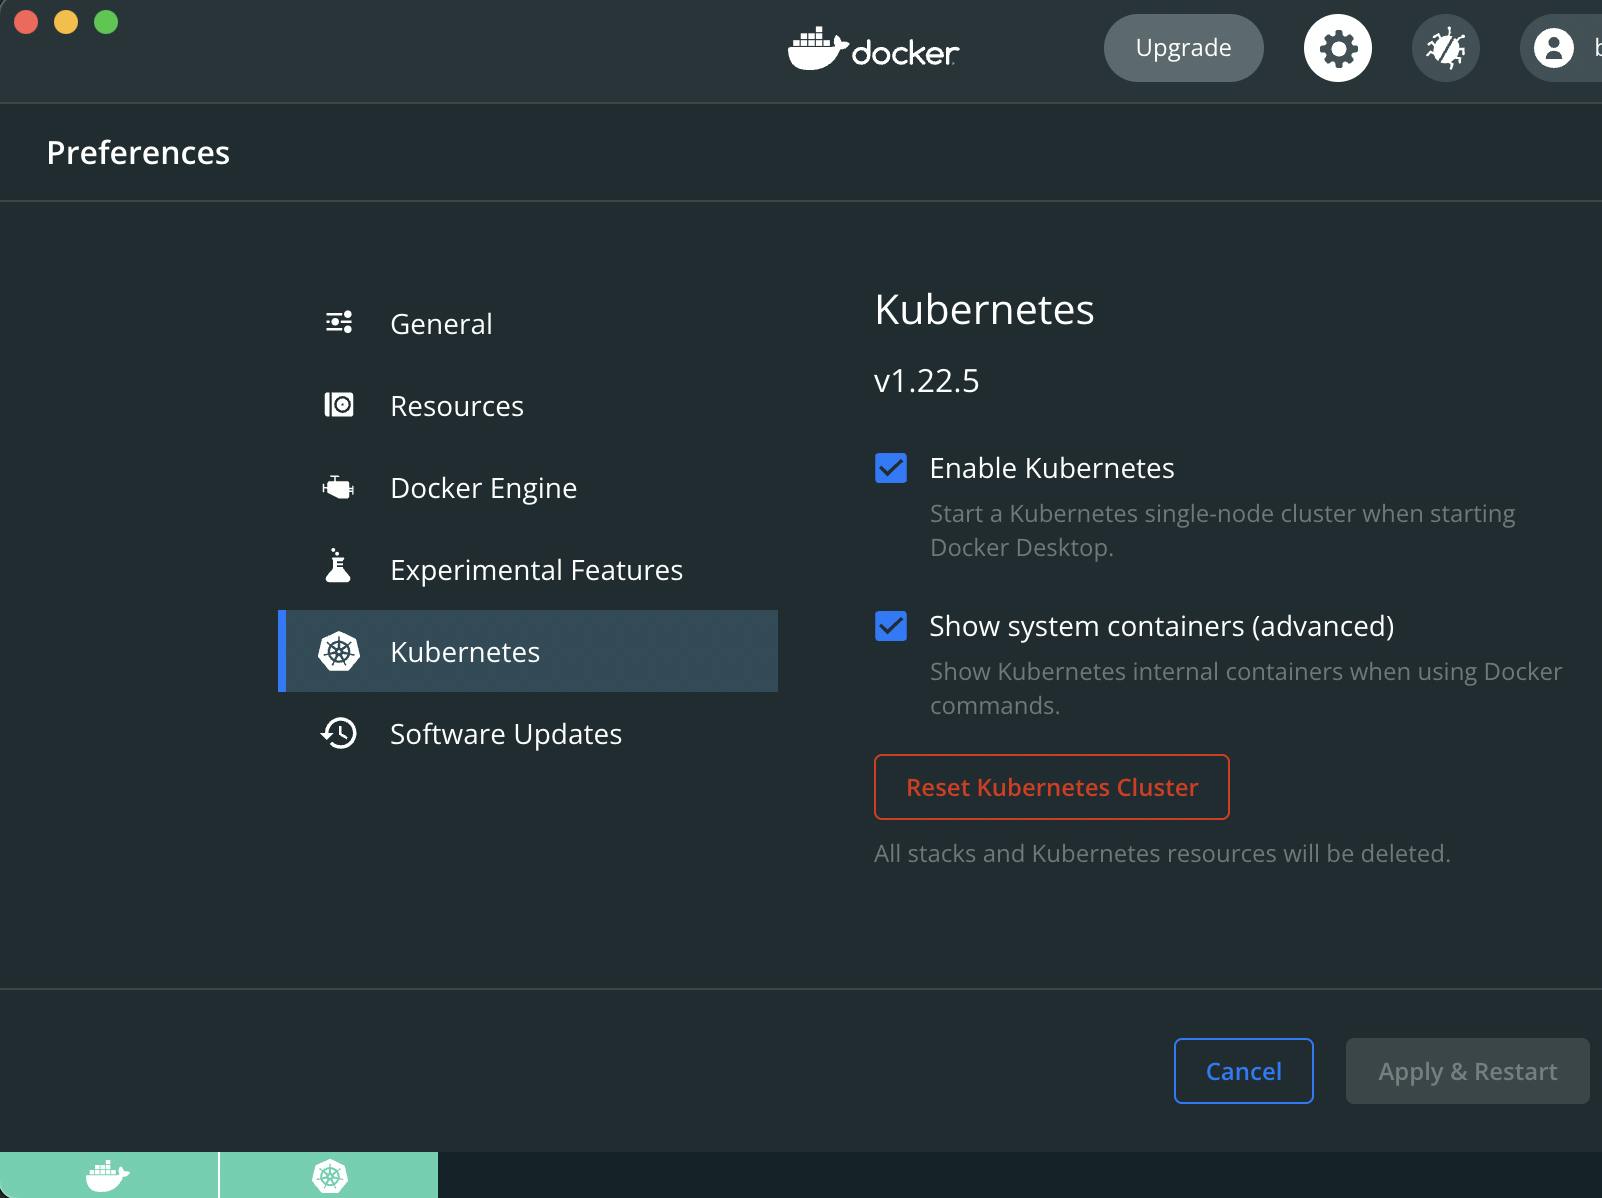
Docker Desktop ships with a Kubernetes integration which, upon activation, installs the kubectl client and launches a single-node K8s cluster. This functionality is disabled by default but the activation requires just a few clicks: In the DD dashboard, a click on the wheel icon in the top right corner opens the Preferences window which has a Kubernetes entry in the menu on the left hand side. After clicking on it, an Enable Kubernetes box appears that should be ticked. A final click on the Apply & Restart button will initiate the download process of the Kubernetes bundle:
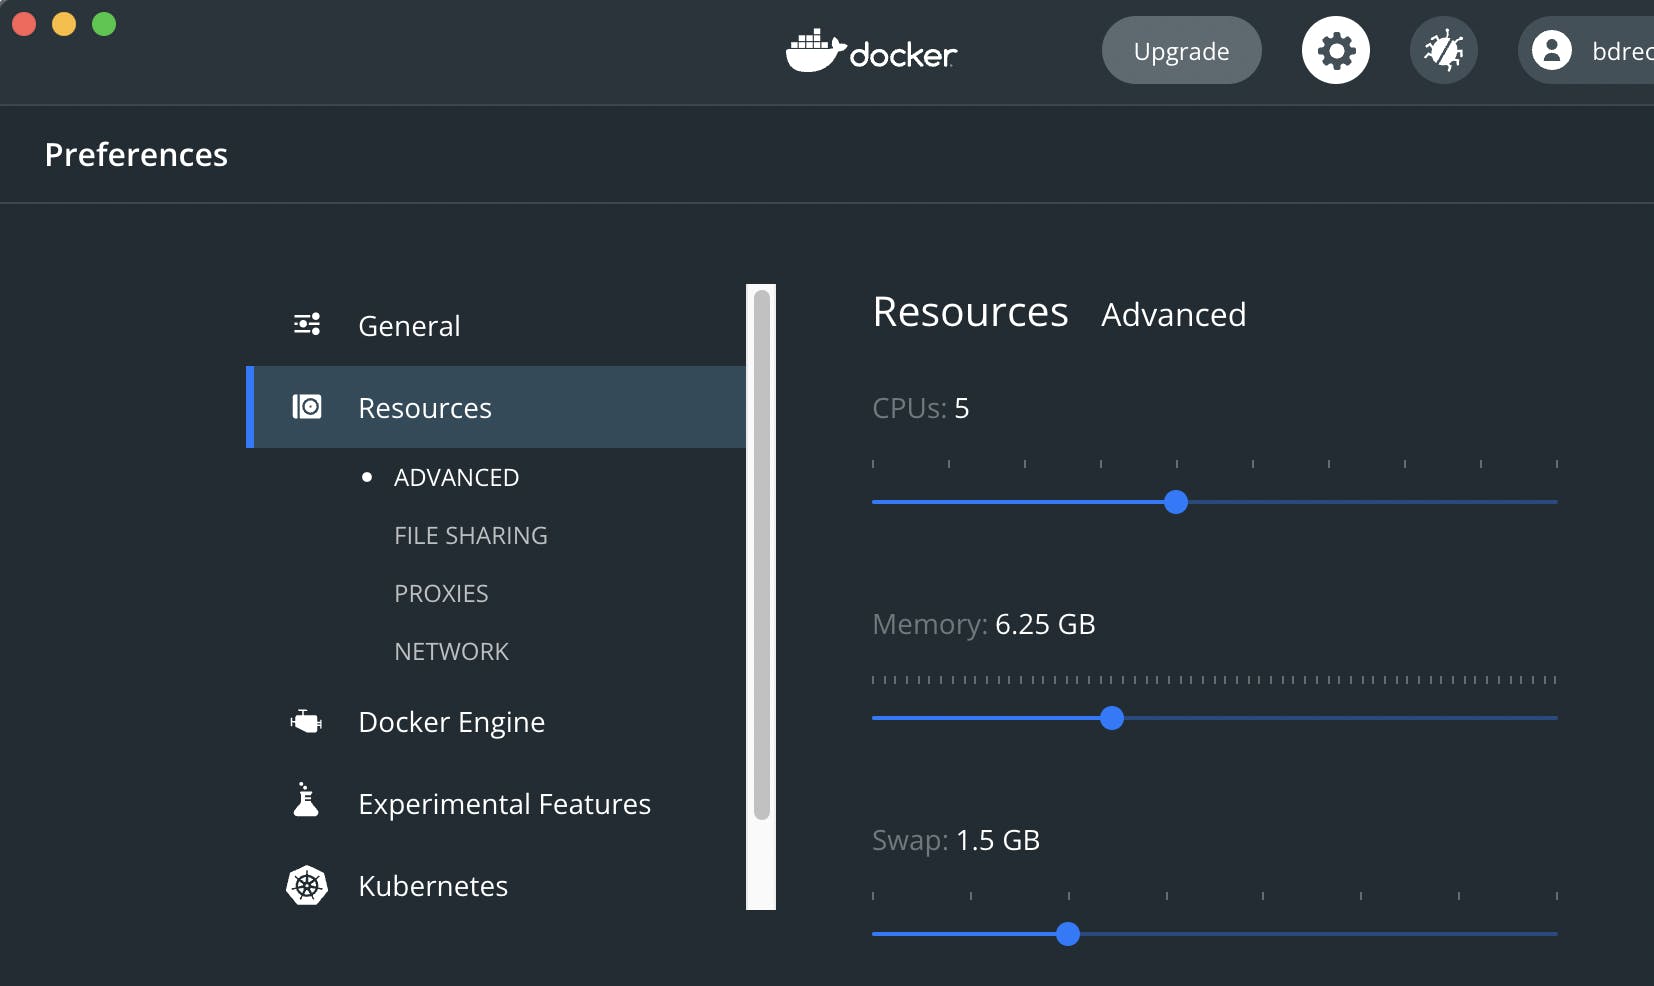
After a successful download and server start, a green K8s icon should appear next to the Docker whale in the lower left corner of the dashboard. It is advisable to adjust the system resources that Docker can consume, the official K8s Spark documentation recommends "3 CPUs and 4g of memory to be able to start a simple Spark application with a single executor". 5 CPUs and around 6 GB of memory should be more than enough for the practical examples in the next article, these values can be set in the Preferencs / Resources / Advanced section:
More than a dozen Docker containers are spawned by the installation, nine of them run in system pods that provide control plane functionality:
$ kubectl get pods --all-namespaces
    NAMESPACE     NAME                                     READY   STATUS    RESTARTS        AGE
    kube-system   coredns-78fcd69978-29npm                 1/1     Running   0               71m
    kube-system   coredns-78fcd69978-cxptm                 1/1     Running   0               71m
    kube-system   etcd-docker-desktop                      1/1     Running   1 (68m ago)     71m
    kube-system   kube-apiserver-docker-desktop            1/1     Running   1 (68m ago)     71m
    kube-system   kube-controller-manager-docker-desktop   1/1     Running   1 (68m ago)     71m
    kube-system   kube-proxy-ks4hz                         1/1     Running   1 (68m ago)     71m
    kube-system   kube-scheduler-docker-desktop            1/1     Running   1 (68m ago)     71m
    kube-system   storage-provisioner                      1/1     Running   0               68m
    kube-system   vpnkit-controller                        1/1     Running   2 (4m10s ago)   68m
The snippet above uses the kubectl binary which (if absent from the system) becomes available after the K8s integration of Docker Desktop is activated. For developers, the kubectl command is one of the primary means of interaction with the K8s API server. Its "current context" should be docker-desktop so in case kubectl was already present on the system, the context can be switched with the command kubectl config use-context docker-desktop:
$ kubectl config get-contexts
    CURRENT   NAME             CLUSTER          AUTHINFO         NAMESPACE
              docker-desktop   docker-desktop   docker-desktop
    *         minikube         minikube         minikube         default
$ kubectl config use-context docker-desktop
$ kubectl config get-contexts
    CURRENT   NAME             CLUSTER          AUTHINFO         NAMESPACE
    *         docker-desktop   docker-desktop   docker-desktop
              minikube         minikube         minikube         default
The terminal output indicates that kubectl is now connecting to the correct K8s server, the one running locally within the Docker instance:
$ kubectl get nodes
    NAME             STATUS   ROLES                  AGE    VERSION
    docker-desktop   Ready    control-plane,master   101m   v1.22.4
$ kubectl cluster-info
    Kubernetes control plane is running at https://kubernetes.docker.internal:6443
    CoreDNS is running at https://kubernetes.docker.internal:6443/api/v1/namespaces/kube-system/services/kube-dns:dns/proxy
This K8s cluster is a single-node, standalone version but still fully featured, "it has all the Kubernetes features your app will enjoy on a real cluster, accessible from the convenience of your development machine"
minikube
The official minikube documentation provides installation instructions for all platforms. On my system, a minikube cluster that uses the Docker driver (minikube start --driver=docker) can use up to two CPUs and 4 GB of memory by default:
$ grep -i  'memory\|cpu'  ~/.minikube/profiles/minikube/config.json
    "Memory": 4000,
    "CPUs": 2,
These values are below the officially recommended "3 CPUs and 4g of memory to be able to start a simple Spark application with a single executor". It is therefore advisable to start a minikube cluster that can allocate more resources so a request for two Spark executors later on can be fulfilled. Unfortunately, it is not possible to dynamically increase the resources (as with Docker Desktop) so an existing minikube cluster needs to be deleted before the higher values can take effect:
$ minikube delete
    Deleting "minikube" in docker ...
    Deleting container "minikube" ...
    Removing /Users/incognito/.minikube/machines/minikube ...
    Removed all traces of the "minikube" cluster.

$ minikube start driver=docker --cpus 5 --memory 6000
    minikube v1.25.1 on Darwin 11.6.2
    Automatically selected the docker driver
    Starting control plane node minikube in cluster minikube
    Pulling base image ...
    Downloading Kubernetes v1.23.1 preload ...
    [...]
    Preparing Kubernetes v1.23.1 on Docker 20.10.12 ...
    [...]
    Done! kubectl is now configured to use "minikube" cluster and "default" namespace by default
For developers, the kubectl command is one of the primary means of interaction with the K8s API server. Its "current context" should be minikube so in case kubectl was already installed, the context can be switched with the command kubectl config use-context minikube:
$ kubectl config get-contexts
    CURRENT   NAME             CLUSTER          AUTHINFO         NAMESPACE
    *         docker-desktop   docker-desktop   docker-desktop
              minikube         minikube         minikube         default
$ kubectl config use-context minikube
    Switched to context "minikube".
$ kubectl config get-contexts
    CURRENT   NAME             CLUSTER          AUTHINFO         NAMESPACE
              docker-desktop   docker-desktop   docker-desktop
    *         minikube         minikube         minikube         default
If Docker was already present on the system, it is advisable to check minikube's Docker context with minikube docker-env. Its output also informs us that eval $(minikube -p minikube docker-env) can be used to point the current shell to minikube's Docker daemon:
$ minikube docker-env
    export DOCKER_TLS_VERIFY="1"
    export DOCKER_HOST="tcp://127.0.0.1:50521"
    export DOCKER_CERT_PATH="/Users/incognito/.minikube/certs"
    export MINIKUBE_ACTIVE_DOCKERD="minikube"
    # To point your shell to minikube's docker-daemon, run:
    # eval $(minikube -p minikube docker-env)

$ eval $(minikube -p minikube docker-env)
The Kubernetes Dashboard
The Kubernetes Dashboard is a popular member of the K8s ecosystem and is pre-enabled in minikube (see below). By contrast, accessing the UI requires some setup effort when the K8s environment provided by Docker Desktop is used:
Provisioning in Docker Desktop
The K8s Dashboard is not included in the Docker Desktop bundle whose installation was described in the previous section. As per the official guideline, this web-based UI can be deployed with the following command:
$ kubectl apply -f https://raw.githubusercontent.com/kubernetes/dashboard/v2.4.0/aio/deploy/recommended.yaml
This will launch two additional pods in a new kubernetes-dashboard namespace. One pod is a metrics scraper, the other one serves the UI. As described in more detail in the next section, security considerations were very important to the K8s architects so the API server cannot be directly accessed with a browser or with clients. Therefore, a secure channel to the cluster has to be established before the Dashboard UI can be viewed, even when a local deployment is used. This can be accomplished by running kubectl in proxy mode, the following command should be entered in a new terminal window:
$ kubectl proxy
    Starting to serve on 127.0.0.1:8001
The Dashboard UI can now be accessed at http://localhost:8001/api/v1/namespaces/kubernetes-dashboard/services/https:kubernetes-dashboard:/proxy/, the local port used (8001 here) should match the value that was printed on the terminal after issuing the kubectl proxy command. When visiting the Dashboard UI, the user is greeted by a login screen which can be passed by authenticating. Several different ways of authenticating users exist, they are listed on the official access control page. The easiest approach is described in detail here and consists in creating a new user with admin permissions. The next snippet follows this approach by deploying the two manifests from the referenced doc page that create a new ServiceAccount and ClusterRoleBinding:
$ kubectl apply -f https://raw.githubusercontent.com/g1thubhub/bdrecipes/master/scripts/dashboard-adminuser.yaml
    serviceaccount/admin-user created
$ kubectl apply -f https://raw.githubusercontent.com/g1thubhub/bdrecipes/master/scripts/dashboard-rolebinding.yaml
    clusterrolebinding.rbac.authorization.k8s.io/admin-user created
A bearer token can now be fetched with the following command:
kubectl -n kubernetes-dashboard get secret $(kubectl -n kubernetes-dashboard get sa/admin-user -o jsonpath="{.secrets[0].name}") -o go-template="{{.data.token | base64decode}}"
This command returns a long alphanumeric sequence which should be copy-pasted (without the last whitespace character) into the Enter Token line of the Dashboard login screen as shown in this screenshot. After the bearer token is successfully submitted, the overview page of the Dashboard UI should appear:
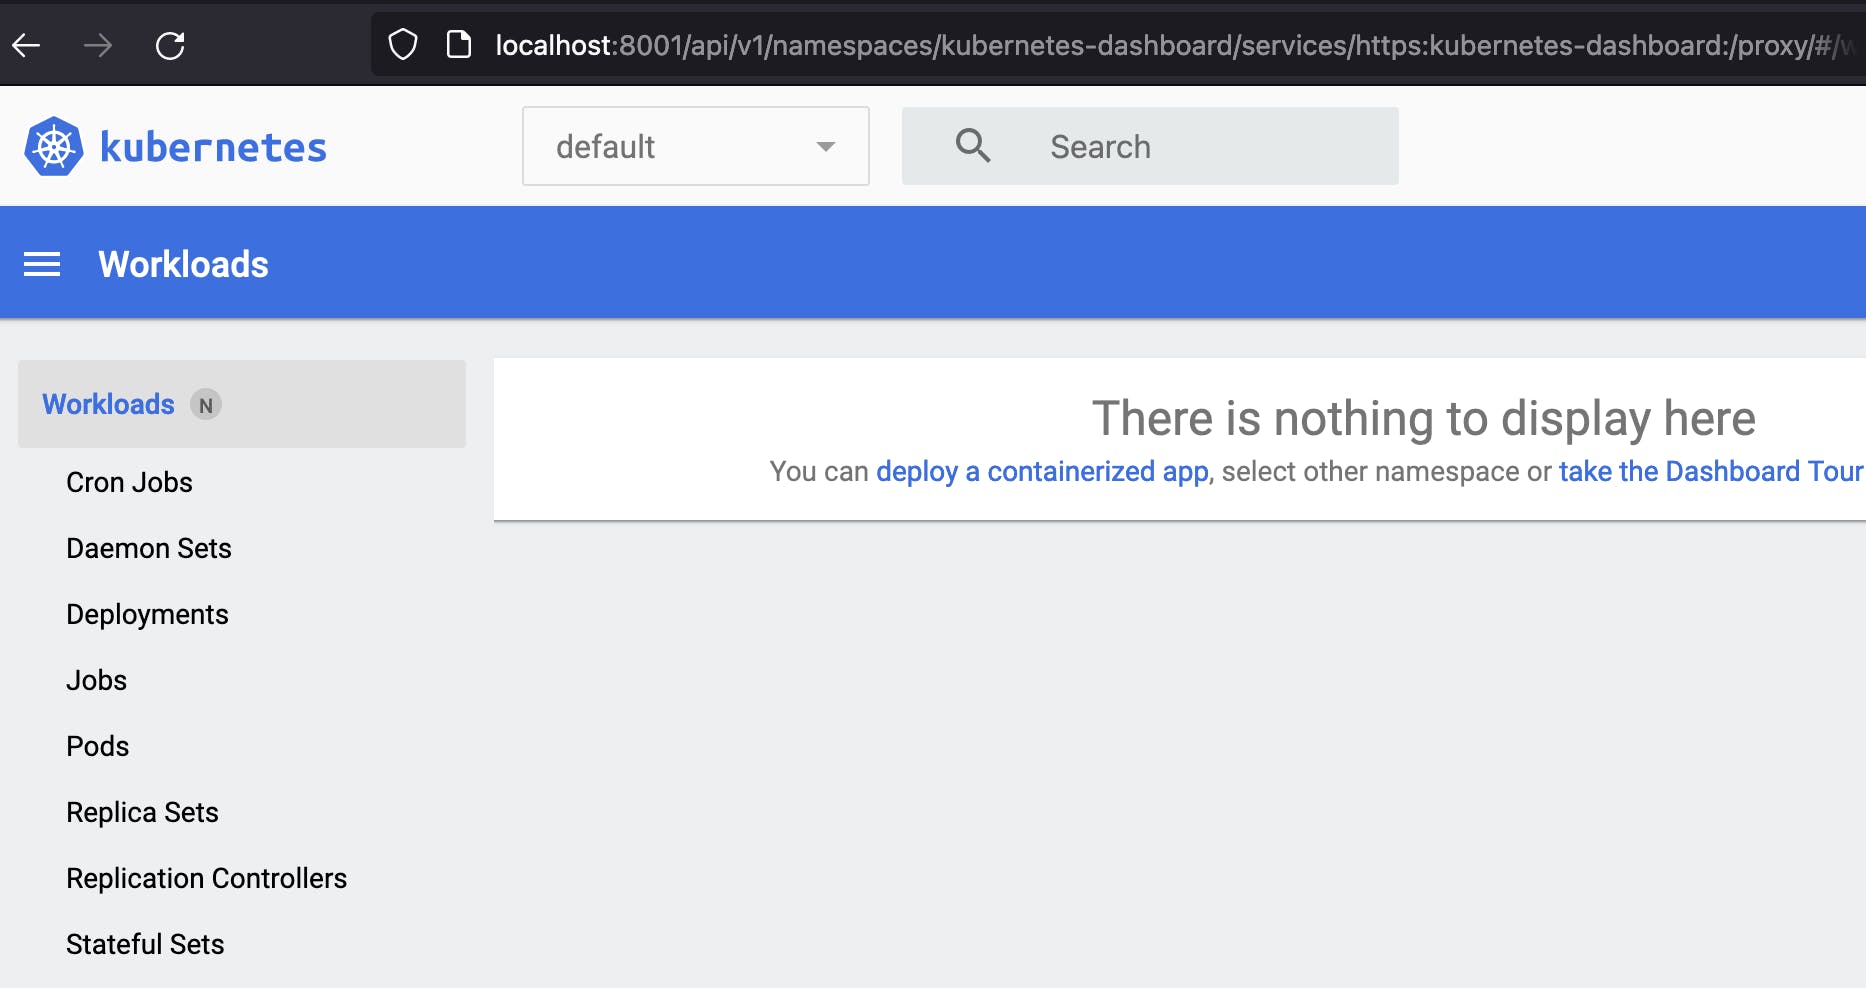
The overview page is mostly blank since the Workloads tab is selected by default and no containerised apps have been submitted yet. But this will change in the next articles.
Accessing the Dashboard UI in minikube
Using the dashboard is considerably easier with minikube thanks to its integrated support. Only one command that starts a proxy needs to be entered before the UI can be accessed:
$ minikube dashboard
    Enabling dashboard ...
        Using image kubernetesui/dashboard:v2.3.1
        Using image kubernetesui/metrics-scraper:v1.0.7
    Verifying dashboard health ...
    Launching proxy ...
    Verifying proxy health ...
    Opening http://127.0.0.1:...in your default browser
A new tab with the Dashboard UI should automatically open in the default web browser. The overview page will look similar to the screenshot above. The command launches two additional pods in a new kubernetes-dashboard namespace. One pod is a metrics scraper, the other one serves the UI:
$ kubectl -n kubernetes-dashboard get pods
    NAME                                         READY   STATUS    RESTARTS   AGE
    dashboard-metrics-scraper-5594458c94-m7296   1/1     Running   0          5h55m
    kubernetes-dashboard-654cf69797-hstpl        1/1     Running   0          5h55m
Security and Networking concepts
Certain deployment options for Spark require the creation of higher-level Kubernetes objects, their underlying concepts are explained in more detail in this section.
Namespaces, Service Accounts, Authentication
One of the reasons for the additional configuration steps required in the dashboard section above is the positive fact that, contrary to the Hadoop stack, security aspects have always been a central concern to the Kubernetes architects: Requests to the control plane have to be authorised and authenticated to succeed, even if they originate from within the K8s cluster. The notions of namespaces and service accounts play a central role: A namespace is a kind of virtual cluster, it provides a "scope for names" and a "mechanism to attach authorization and policy to a subsection of the cluster". A ServiceAccount identifies and authenticates processes that run in pods. Service accounts are namespaced and every namespace instantiates a default ServiceAccount which is not unsurprisingly named default. Therefore, the default namespace always has a default ServiceAccount. In the follow-up articles, a non-default ServiceAccount with additional permissions is created and used for launching Spark applications.
Let's try to access the API server from within a pod via the curl http client. But first, it is advisable to "manually" download certain container images from a registry so the pods can directly pull them from the local cache. When a larger Docker image like bdrecipes/spark-on-docker is pulled in a cluster hosted by minikube/Docker Desktop for the first time, timeouts during the pod bootstrapping phase can occur if the download process takes several minutes. Therefore, the following command should be entered whenever a new K8s cluster is provisioned and examples from this article are used:
$ docker pull bdrecipes/spark-on-docker:latest
    latest: Pulling from bdrecipes/spark-on-docker
    [...]
    Digest: sha256:e3107d88206f...
    Status: Downloaded newer image for bdrecipes/spark-on-docker:latest
    docker.io/bdrecipes/spark-on-docker:latest
The one-liner below uses this image to spawn a stripped-down version of the interactive pods that will be launched later on (with interactive_pod.yaml). After creating the pod, the following kubectl run command attaches the pod container interactively to the local terminal session which is indicated by a new prompt sh-5.0$:
$ kubectl run -i --tty --rm interactive-pod --image=bdrecipes/spark-on-docker:latest --restart=Never -- sh
    If you don't see a command prompt, try pressing enter.
sh-5.0$
Since no namespace or ServiceAccount details were mentioned, the pod is launched in the default namespace under its default ServiceAccount. Contacting the K8s API server anonymously will fail even if the pod is "inside" the cluster network and the server connection is not verified on purpose (--insecure flag):
# From the interactive pod's terminal:
sh-5.0$ curl https://kubernetes/api/ --insecure
    {
          "kind": "Status",
          "apiVersion": "v1",
          "metadata": {},
          "status": "Failure",
          "message": "forbidden: User "system:anonymous" cannot get path "/api/"",
[...]
An authenticated and secure request requires two credential items, a central certificate and an access token. Both are provided by a pod's ServiceAccount and are already present in the filesystem of the container into which we dropped right after creating the pod:
# From the interactive pod's terminal:
sh-5.0$ cd /var/run/secrets/kubernetes.io/serviceaccount/
sh-5.0$ ls -l
    lrwxrwxrwx 1 root root 13 Oct 31 12:43 ca.crt -> ..data/ca.crt
    lrwxrwxrwx 1 root root 16 Oct 31 12:43 namespace -> ..data/namespace
    lrwxrwxrwx 1 root root 12 Oct 31 12:43 token -> ..data/token
When this access token and authentication certificate ca.crt are specified in the API request, it succeeds:
# From the interactive pod's terminal:
sh-5.0$ TOKEN=$(cat /var/run/secrets/kubernetes.io/serviceaccount/token)
sh-5.0$ CERT='/var/run/secrets/kubernetes.io/serviceaccount/ca.crt'
sh-5.0$ curl --cacert $CERT -H "Authorization: Bearer $TOKEN" https://kubernetes/api/
    {
          "kind": "APIVersions",
          "versions": ["v1"],
          "serverAddressByClientCIDRs": [
[...]
The manifest file that is used for creating launch pods in the next articles contains an env entry in which environment variables similar to TOKEN and CERT are declared. This spares the user from manually defining variables that point to credential items each time a new interactive pod is launched.
Role Bindings
If the curl request contacted a more restricted endpoint like https://kubernetes/api/v1/namespaces/default/, another failure would occur as the default ServiceAccount is not yet authorised to read the default namespace:
# From the interactive pod's terminal:
sh-5.0$ curl --cacert $CERT -H "Authorization: Bearer $TOKEN" https://kubernetes/api/v1/namespaces/default/
    {
        "kind": "Status",
          "apiVersion": "v1",
          "metadata": {},
          "status": "Failure",
          "message": "namespaces "default" is forbidden: User "system:serviceaccount:default:default" cannot
               get resource "namespaces" in API group "" in the namespace "default"",
[...]
One authentication method consists in expanding the permissions of the default ServiceAccount which is where role bindings come into play: A role binding links a ServiceAccount in a namespace to a list of rules/rights which are referred to as (cluster) role in Kubernetes lingo. The rules of a cluster role are cluster-scoped, those of a role target a specific namespace. Entering the following command in a new terminal will grant the default ServiceAccount read-only access to most namespace objects:
$ kubectl create rolebinding bigdata-rolebinding --clusterrole=view --serviceaccount=default:default
As promised, the pod query succeeds now:
# From the interactive pod's terminal:
sh-5.0$ curl --cacert $CERT -H "Authorization: Bearer $TOKEN" https://kubernetes/api/v1/namespaces/default/
    {
        "kind": "Namespace",
          "apiVersion": "v1",
          "metadata": {
            "name": "default",
[...]
After deleting the role binding (kubectl delete rolebinding bigdata-rolebinding), the request fails again.
Services
The previous paragraphs have explored the interactions between a pod and the API server in the control plane. The networking characteristics of these two Kubernetes constructs are very different – pods are disposable and tend to have shorter lifecycles so the network identities in a group of pods can change rather frequently. The service abstraction addresses potential client access problems by mapping a logical set of pods to a single and consistent network identifier which is load-balanced. From a new terminal window, the following snippet launches a small population of pods and creates a service object (named standard-service) afterwards via kubectl expose:
$ kubectl create -f https://raw.githubusercontent.com/g1thubhub/bdrecipes/master/scripts/spark-worker-controller.yaml
    replicationcontroller/spark-worker-controller created
$ kubectl expose rc spark-worker-controller --name standard-service
    service/standard-service exposed
$ kubectl get svc
    NAME               TYPE        CLUSTER-IP       EXTERNAL-IP   PORT(S)    AGE
    kubernetes         ClusterIP   10.96.0.1        <none>        443/TCP    18h
    standard-service   ClusterIP   10.109.125.154   <none>        8081/TCP   2s
The ClusterIP entry in the type column means that these services are only accessible from within the K8s cluster. Apart from the default ClusterIP type, Kubernetes supports three other service types which are explained here. The spark-worker-controller.yaml manifest is taken from the Standalone Mode section below, it starts two worker pods and a replication controller that manages them. Each instance of a Spark worker serves a web UI at port 8081 (a screenshot is captured here) that displays monitoring information. Switching back to the terminal that is attached to the interactive pod's shell, a search for the cluster IP address of the standard-service returns the following response:
# From the interactive pod's terminal:
sh-5.0$ host standard-service
    standard-service.default.svc.cluster.local has address 10.109.125.154
Upon lookup, the standard-service which is backed by a replication controller with two worker pods resolves to a single-service, virtual cluster IP ("has address 10.109.125.154"). When curling the Spark worker UI via the service name, an html response is returned whose title section contains the internal IP of the pod on which a worker daemon is running:
# From the interactive pod's terminal:
sh-5.0$ curl standard-service:8081
    [...]
     <title>Spark Worker at 172.17.0.6:33909</title>
sh-5.0$ curl standard-service:8081
    [...]
    <title>Spark Worker at 172.17.0.7:40419</title>
sh-5.0$ curl standard-service:8081
    [...]
    <title>Spark Worker at 172.17.0.7:40419</title>
sh-5.0$ curl standard-service:8081
    [...]
    <title>Spark Worker at 172.17.0.6:33909</title>
Apparently, the standard-service routes the requests to one of the associated worker pods (IPs 172.17.0.6 or 172.17.0.7) – Kubernetes services provide load balancing functionality.
Headless Services
A headless service is a service without a cluster IP and without load balancing functionality. This subclass is of particular relevance for Spark workloads and will be utilised in the practical chapters. The following command creates a headless service by specifying the flag --cluster-ip=None:
$ kubectl expose rc spark-worker-controller --name headless-service --cluster-ip=None
    service/headless-service exposed
A cluster IP does not get allocated for the new headless-service. Therefore, a DNS lookup from the interactive pod's shell returns the internal IPs of the two worker pods as opposed to the single virtual IP that was returned in the standard-service example above:
# From the interactive pod's terminal:
sh-5.0$ host headless-service
    headless-service.default.svc.cluster.local has address 172.17.0.6
    headless-service.default.svc.cluster.local has address 172.17.0.7
Under a headless service, individual members of a pod group can be directly accessed which is exactly what is required when a Spark worker wants to send a life signal back to the driver:
# From the interactive pod's terminal:
sh-5.0$ curl 172-17-0-7.headless-service.default.svc.cluster.local:8081
    [...]
    <title>Spark Worker at 172.17.0.7:40419</title>
Multiple K8s objects were created over the course of this section so some housekeeping is required before the next topic can be covered:
$ kubectl delete rc spark-worker-controller
    replicationcontroller "spark-worker-controller" deleted
$ kubectl get pods
    NAME                            READY   STATUS        RESTARTS      AGE
    interactive-pod                 1/1     Running       0             2h
    spark-worker-controller-72xqq   1/1     Terminating   5             2h
    spark-worker-controller-r9s6w   1/1     Terminating   4             2h
$ kubectl delete pod interactive-pod
    pod "interactive-pod" deleted
$ kubectl get services
    NAME               TYPE        CLUSTER-IP       EXTERNAL-IP   PORT(S)    AGE
    headless-service   ClusterIP   None             <none>        8081/TCP   2h
    kubernetes         ClusterIP   10.96.0.1        <none>        443/TCP    2h
    standard-service   ClusterIP   10.109.125.154   <none>        8081/TCP   2h
$ kubectl delete service standard-service
    service "standard-service" deleted
$ kubectl delete service headless-service
    service "headless-service" deleted
Old School: Standalone Mode on Kubernetes
The practical parts of this article series will demonstrate how Spark workloads can be natively run on Kubernetes in various ways. For pedagogic reasons, we first explore in theory how applications had been deployed to K8s before a native integration was available. The approach is similar to the one followed in the previous chapter in which Spark programs are executed as multi-container Docker applications via Spark's standalone mode. The K8s equivalent of this deployment option can still be found in the official Kubernetes codebase: It contains a directory whose content will "create a functional Apache Spark cluster using Kubernetes and Docker". More precisely, the example bootstraps a standalone Spark cluster on Kubernetes by spawning a containerised Standalone Master and several containerised Spark Workers.
The official example can be condensed as some parts have become obsolete or are not relevant to the discussion: At first, a Master service is started by creating a replication controller (with spark-master-controller.yaml) and a service endpoint (with spark-master-service.yaml). Replication controllers are outdated now and were replaced by Replicasets. These workload resources manage the life cycle of pods, they ensure for example that the desired number of pods is up and running. The service endpoint opens a direct communication path between pods, the Interactive Pod - Client Mode sections in the follow-up articles explain this topic in more detail. A Master service consisting of one replication controller that maintains one backend pod (in which the Master process runs) could be launched with the following command pair:
$ kubectl create -f https://raw.githubusercontent.com/g1thubhub/bdrecipes/master/scripts/spark-master-service.yaml
    service/spark-master created
$ kubectl create -f https://raw.githubusercontent.com/g1thubhub/bdrecipes/master/scripts/spark-master-controller.yaml
    replicationcontroller/spark-master-controller created
The actual computational work is performed by executors which run on Worker nodes. The counterpart to the Master controller could be created with spark-worker-controller.yaml. The deployment of this declarative specification launches a replication controller which manages two worker pods:
$ kubectl create -f https://raw.githubusercontent.com/g1thubhub/bdrecipes/master/scripts/spark-worker-controller.yaml
    replicationcontroller/spark-worker-controller created
The three kubectl create commands above create two replication controllers that manage three pods. Accordingly, the K8s Dashboard would be populated with five Kubernetes objects:
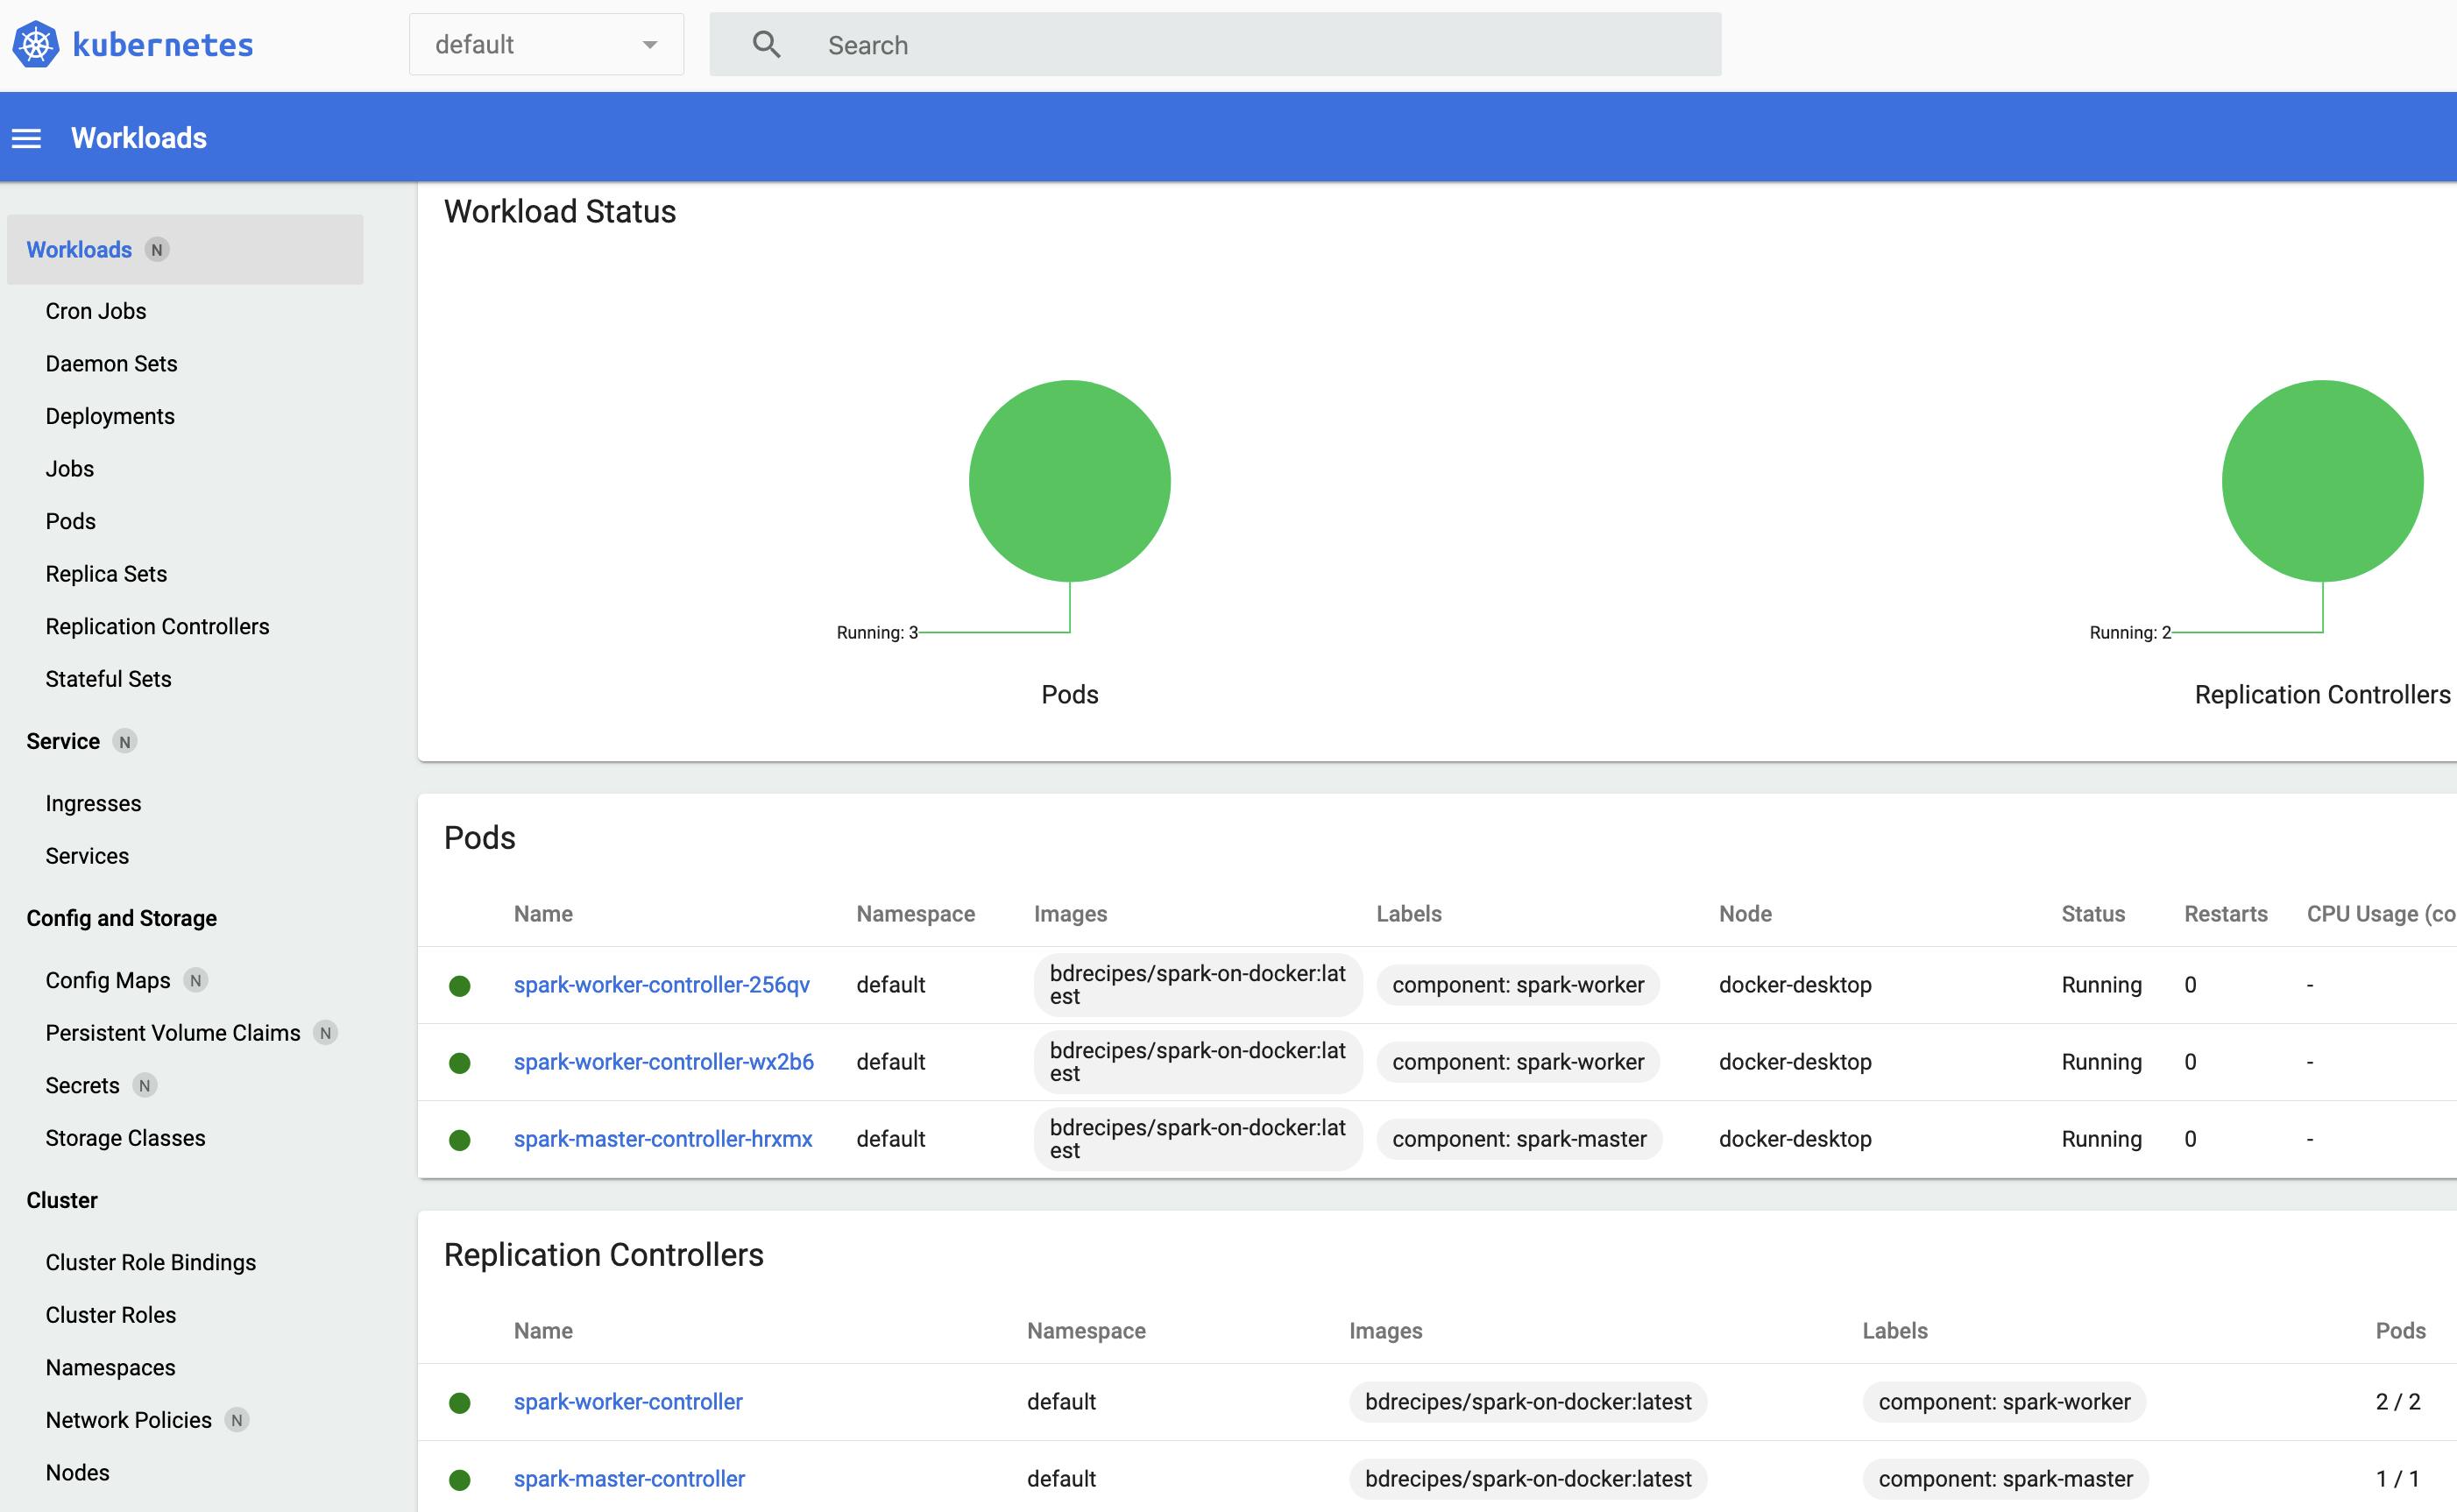
Similar to the multi-container setup of the previous chapter, applications could now be launched against the Spark Master (--master spark://spark-master:7077) and their executors would run on the two worker pods. The diagram below visualises this deployment strategy on a small K8s cluster:
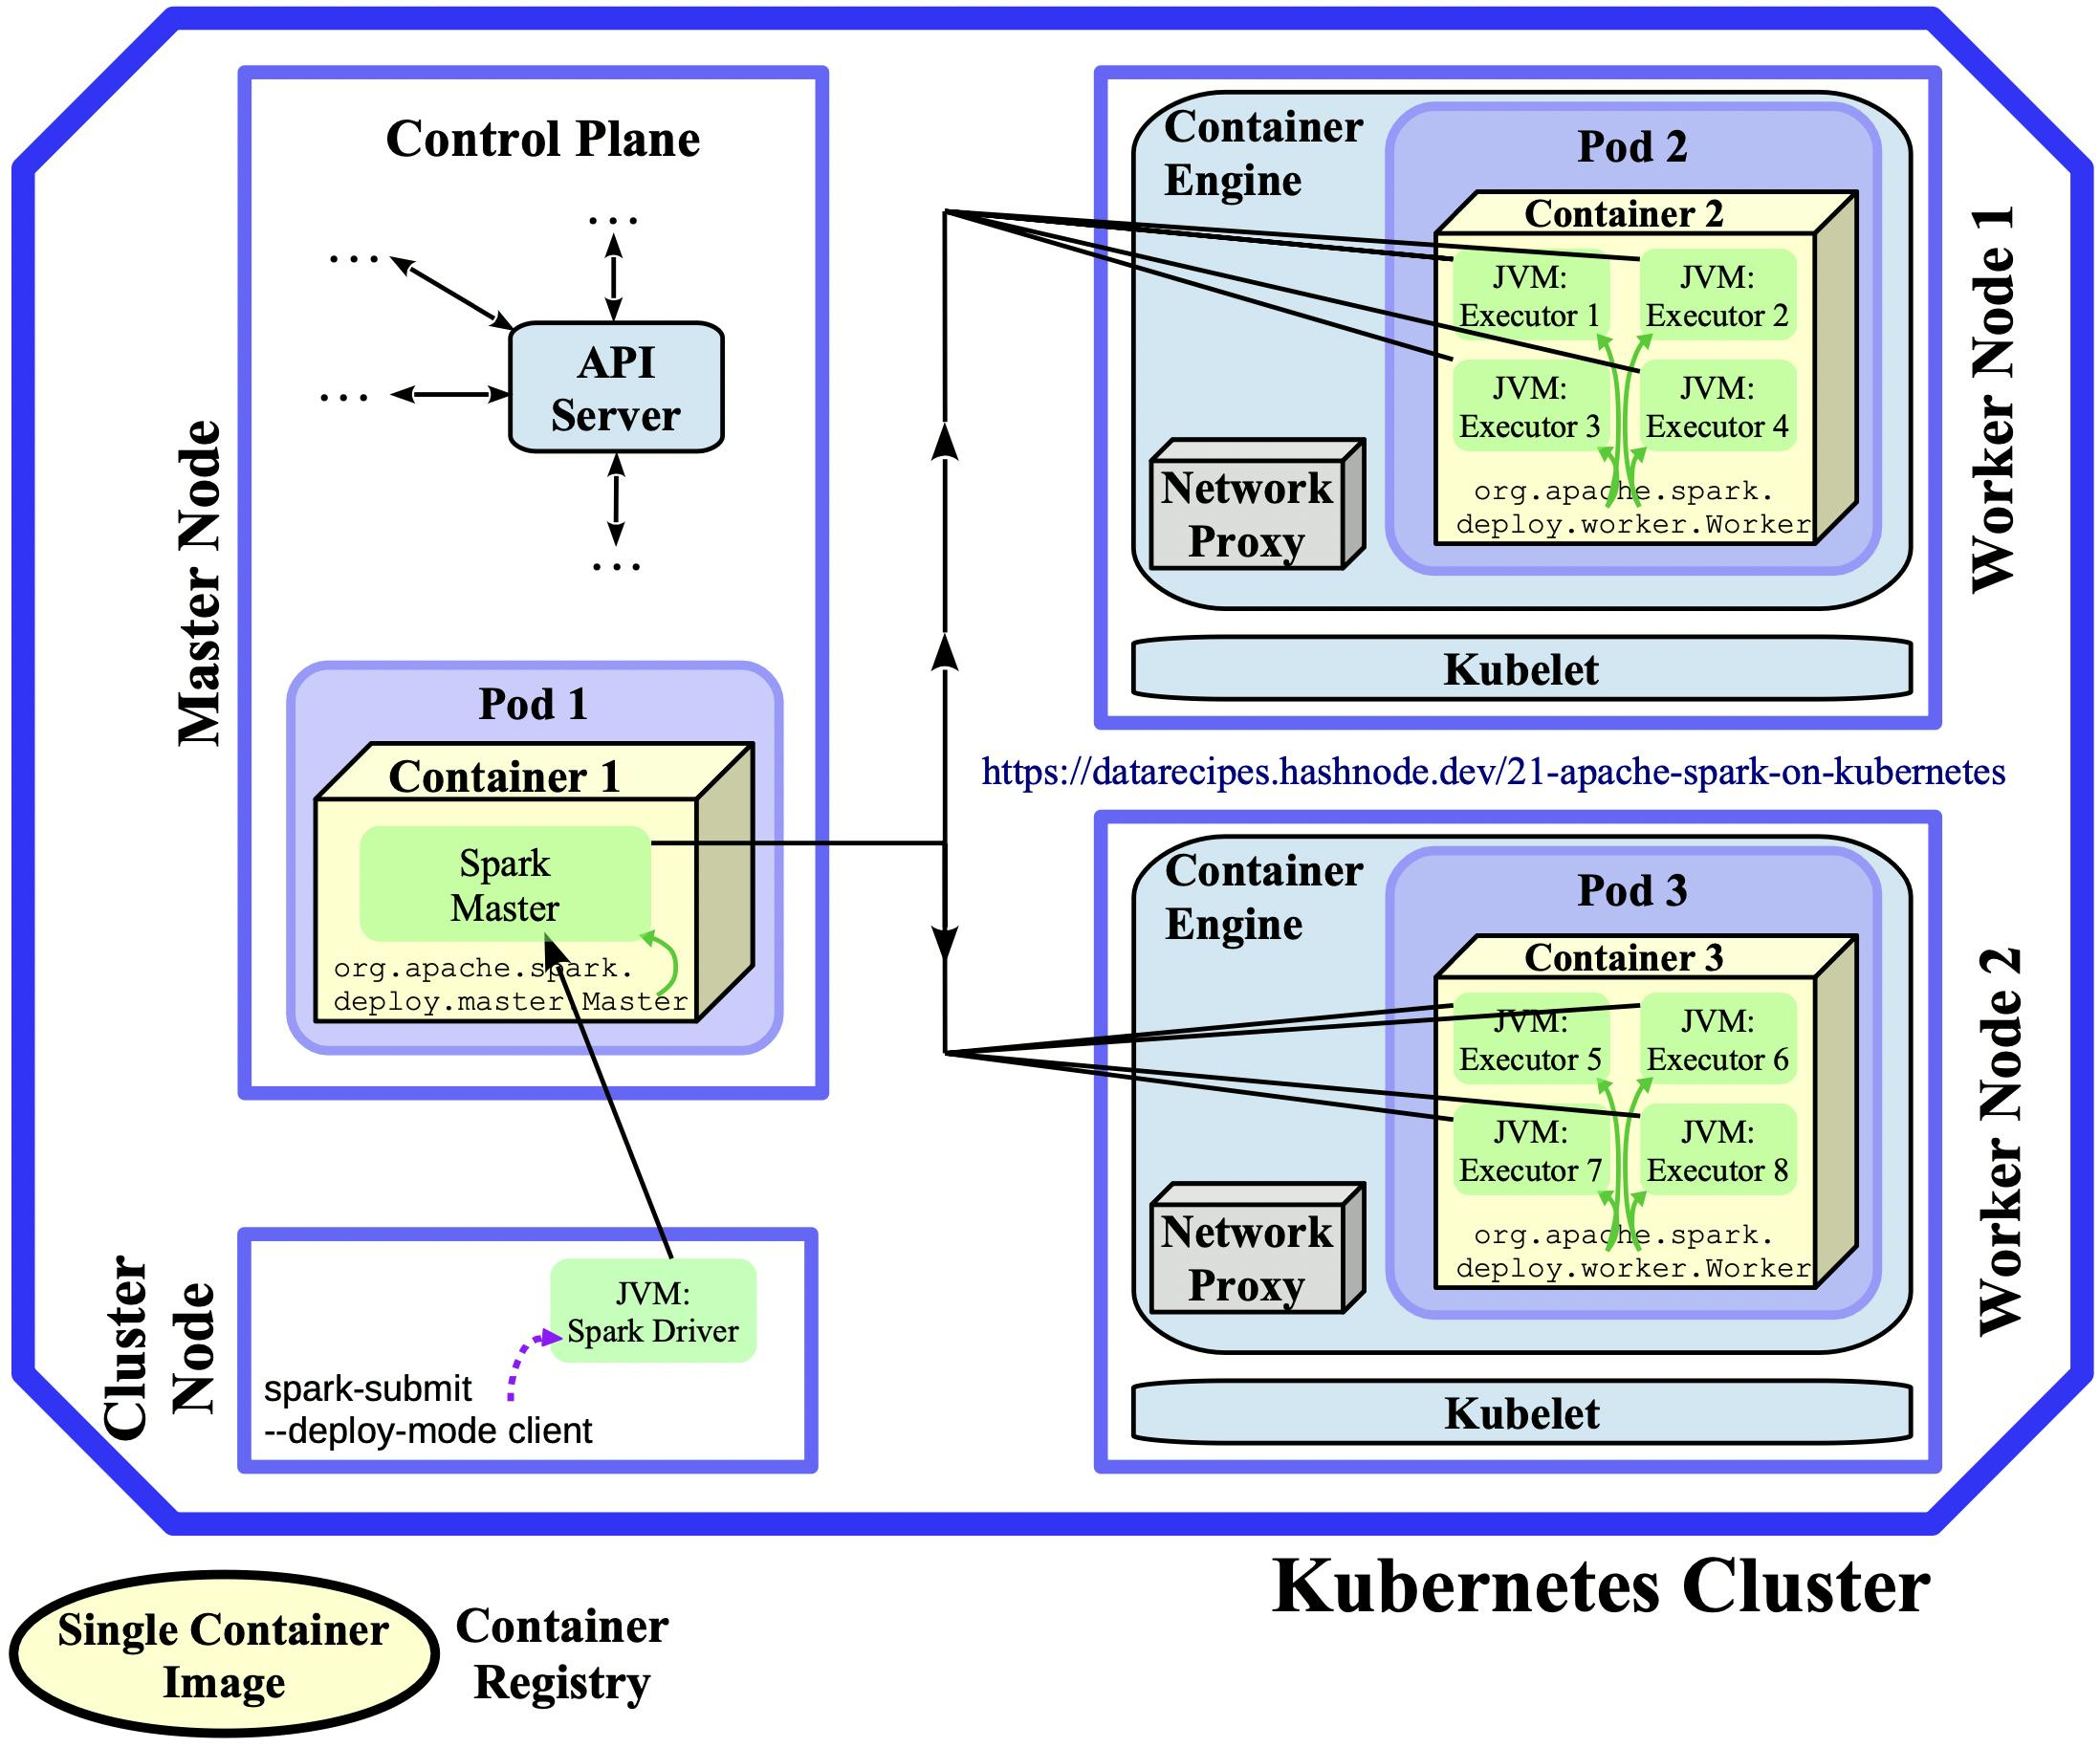 Diagram 2.2: Standalone Architecture
However, this standalone approach has a number of major disadvantages, for example:
- On the master node, one cluster manager runs alongside another cluster manager without being aware of the co-existence. This leads to more overhead and two different configuration/deployment layers exist.
- Concurrent applications run on a fixed set of worker nodes so there is less isolation and flexibility. They have the same underlying container image, the one that was used to bootstrap the standalone cluster. Therefore, applications cannot use different Spark versions/dependencies.
- Native K8s features (e.g., elasticity) and constructs (like namespaces or service accounts) cannot be directly utilised in Spark applications.
Therefore, this deployment option is not pursued any further here, a unified approach exists now which is described in the next articles. Deleting the two replication controllers should terminate all five objects eventually so no pods are left running:
$ kubectl get replicationcontrollers
    NAME                      DESIRED   CURRENT   READY
    spark-master-controller   1         1         1
    spark-worker-controller   2         2         2
$ kubectl delete -n default replicationcontroller spark-master-controller
    replicationcontroller "spark-master-controller" deleted
$ kubectl delete -n default replicationcontroller spark-worker-controller
    replicationcontroller "spark-worker-controller" deleted
The hands-on article with Docker Desktop is posted here, its minikube twin can be accessed here